Showing posts with label Elecraft. Show all posts

Tuesday, February 9, 2021

What has happened to Elecraft?


 For the first time in a very long time, my radio shack is without an Elecraft product.  I was and still am a big Elecraft fan and had 2 Elecraft K2's that I built, KX1, K3 and finally a KX3. The only rig I had left was the KX3 and a short time ago that rig was sold off. As with most hams sold equipment becomes ham bucks for new things. I may regret selling my KX3 but at this time that has not happened.  I really needed to upgrade my PC and it was the KX3 funds that allowed me to do that. 

My KX1

I was on the internet this afternoon and wanted for old time sake visit the Elecraft website and what I found was shocking! I went to the order/shipping status page as I was feeling the fuzzies for maybe another K2 to build.  I saw the K4 and its ongoing status update link but then I saw "K3S no longer available" I took a double-take! That was the flagship of Elecraft.  It gets better......the K3/K3S add-on kits are for the most part " availability TBD" so much for an upgradable radio. 

Then there were the back orders KX3, KPA100 amp,  KX2 and K2. I am not sure if it's COVID that has put things in a tailspin but as an Elecraft fan, I was shocked to see this.  

One of my K2's

Sunday, October 15, 2017

Going about it the hard way.....WHY??

Last evening I finally had some time to get on the PC and check out what fellow ham radio bloggers were up too. For the past month I have been working every day and only having time to "fast read" a post and drop a short comment. While surfing the blog sphere last evening I came across KG3V's blog, the subject of the blog caught my attention "Updating FTDX-3000 Firmware. Below is a link to what I only could call an "adventure".
https://kg3v.com/2017/10/14/updating-ftdx-3000-firmware/

In the post Tom does a great job explaining how he went about the firmware upgrade and some issues he ran into. Tom also goes over the enhancements this firmware will forward to his FTDX-3000. It's fantastic how far we have come in radio, in the past if you wanted the upgrades it meant selling what you had and purchasing the new and improved version. Today's modern rigs can chat either over the internet or with pre-downloaded thumb drives and magic is worked within the rig to either over come an issue, enhance what is already there or add something new! Having said that I just can't understand what the issue is with the process of the upgrade. It's just not ham radio with our Nikon cameras to upgrade the firmware it's...hold this while pushing that....make sure you don't do this while doing that....and on and on and on. Resources are used writing the rigs new firmware upgrade, time and money is put into it and it's to make the product better for the end user. If this is the case why the %&^* not make the process for the end user easy peasy!!
Having said the above and let me preface this with "I am not going to say what I am about to say just because I am a fan of Elecraft but if the shoe fits......" To upgrade my K3 or KX3 Elecraft has provided via their website a program that sits on your desktop, one of it's functions is for firmware upgrades. The process is as follows:
1. Double click on desktop icon.
2. Click on Firmware tab.
3. Click on "Check versions now"
4. Below you will then see the firmware that is installed in your rig and new firmware that is available for your rig. You then click on "Send all new firmware to K3 or KX3.
Your rig will start to click, there will be "stuff" flashing on the rigs screen, sometimes even clicking noises from the rig and then your rig's screen returns to normal and your done. I have owned Kenwood, Icom and Yeasu rigs and never has it been this easy and my question is WHY NOT!!! Now having said the above it is true I have not owned one of the above rigs for some time now so do comment if the process has changed...but is sure does not seem it has for the FTDX-3000 model rig!
OK I'm off my soapbox now....:))

Sunday, July 16, 2017

Skunked on my day out.

The setup in the car
The CHA P loop 
On Saturday wife and I had some errands to do in the town we used to live in, it's about an hours drive from were we are now. Julie had an appointment that would last for approximately 2 hours so I felt bringing the Elecraft KX3 would help pass this 2 hour time slot. I brought along my new loop antenna from Chameleon CHA P loop antenna . (A review of this antenna is coming soon) The weather was great and I had my spot preplanned out, it was along a river that flowed through town and there was a nice picnic table there that I have used in the past. Once I dropped of Julie for here appointment it was off to the river, I found there was a wedding shoot going on and the table was not gone! I then had to scope out a new spot which did not take long. The new spot was in a parking lot at the entrance to a park, not the same view as the river side setup but it will do. I was keying out CQ for about 1.5 hours with no answers but I did hear some stations but they were already in QSO's. I did check the Reverse Beacon Network to make sure my CW signal was getting out and it was, the conditions were good as well but I guess it was just time for me to give my CW fist a workout. As always Murphy seems to make his visit at least once on my outings. On this day Murphy decided to make my CW operations a bit more challenging. For a long time I have been using the Palm Radio's Mini Paddle. I find this paddle to be very smooth and very well made. A number of years ago the folks at Palm Radio sent me their newly revised cable that goes from the rig to the paddle. It was lighter and more easy to work with and a great improvement over the more bulky cable that was being used in the past.  I have owned this cable for about 5 years without any issues until yesterday on my outing. The end that plugs into the paddle had come apart, the two parts are held together by a screw. I thought at the time I just failed to check the screw and it came loose. I did not have a mini screw driver with me so I had to very carefully plug the connector into the key. Once I got home and upon closer look I realized the connector was broken and the only choice I had was to glue the two pieces together. I did this and it worked fine but in the end this is a one time fix. Overall I made no contacts but it was nice to get out and just have the enjoyment of getting on the radio and it's very relaxing.
Reverse Beacon Network
The broken connector 

Sunday, May 14, 2017

Customer service excellance

An update from my last post regarding my Chameleon CHA P Loop antenna, the antenna bag zippers were repaired and the cost was 40.00 Canadian. I decided  to have some heavy duty zippers installed and I emailed DX Engineering and we agreed the cost would be 50/50. I submitted the bill to Maria at DX Engineering and to my surprise the total amount was covered! I emailed Maria about this and she told me she took the bill to her boss and he informed Maria to cover the whole cost. DX Engineering for sure is a class act!!
Lets move along to another class act.....I have been using Win4k3 suite software for rig control for over a year now. Tom VA2SFQ has software what will work with the Elecraft K3,K3S, KX3 and KX2. Tom has been updating the software on a very consistent basis. The software is very stable one just has to read Eham to see it's rated 4.9 out of 5. I have emailed Tom with some questions and he has replied very fast with a solution. Recently I had some issues and we were emailing back and forth to try to bring things to a resolution. On the weekend Tom asked me if I had Teamviewer (and I do) he wanted to use Teamviewer to take control of my PC and solve my issue once and for all. On Saturday evening I received a call from Tom on my cell and we linked my PC via Teamviewer and Tom took control. Tom stuck with me for 40 mins and he solved my issue and I was up and running again. I have never in all my days had this type of customer service. It is very obvious that Tom is committed to not only his software but to his customers. Tom was very pleasant on the phone as he sorted out the problem.

Monday, April 17, 2017

Some DX contacts today.

I had some spare time today  and was able to get on the radio! Over the past month or so it has been lots of work and no time to play radio. Today while on 20m CW  I was able to snag HA7GN from Hungary, IQ0PG from Italy I was given special report number of UN90ARI1.  According to their site this qualifies me for there ARI 90 years award. The last contact of the day was IO0MDC again from Italy and this call was in celebration of 20 years for the Mediterraneo DX club. I was thrilled with
these short contacts and I really was only on for about 20 min's. On a side note.........I have posted in the past that I am the proud owner of an Elecraft K-pod. This thing works great and is a great asset to the shack. It has 8 programmable push buttons, at my age I loose track of what is on what button! I came up with an idea of adding some magnetic strips with the naming of each of the buttons. Since they are magnetic I can remove them when the button macro has been changed or rearrange them if need be.

Monday, January 2, 2017

A review of the Elecraft K-Pod

When I first opened the box I noticed it was packed very well and as I held the K-Pod for the first time I noticed it had some weight to it. The K-Pod is built very solid and would not move around on the radio desk as you used it. There is a tilt stand that places the K-Pod at a very nice operating angle, this stand can be removed if you would rather have the K-Pod sit flat on your desk. The VFO is very smooth and the user is able to adjust the drag if need be but I was very happy with the VFO right out of the box. There are 8 buttons on the K-Pod that can be programmed with macros, each button has a tap and hold function you therefore have 16 macros. Macros are a great way to have a one button push (or hold) to control a commonly used button on the K3. Also Macros can be used to preform a multi task function. For example I have programmed a CW Split macro that puts the K3 in CW mode, sets VFO A and B to the same frequency, moves VFO B up 2 kHz, sets the filter to 400 Hz, clear both the RIT and XIT and locks VFO A on frequency. All this is done with the push of one button. The instruction manual gives you many Macros to choose from. You can program your own and try them out using the K3 utility program on your PC. On Elecraft's website you can download free of charge their programers reference to learn more about macros and programming them.
There is a rocker switch that will allow you to smoothly switch from VFO A (LED D1 lights up) to B (LED D2 lights up) and then to RIT/RXT (LED D3 lights up) adjustments. The manual says that LED4 is user programable and you can actually control the on/off function of D1, D2 and D3 as well.
On the top of the K-Pod there are 4 connection ports:

  1.  Auxiliary outputs that the manual says can be used for an external antenna switch, amplifier and so on.
  2. DATA connector is used to connect an RJ12 cable (supplied) to the K3. 
  3. USB connector (USB cable is supplied) is used to interface the K-Pod with your PC for firmware updates and for what Elecraft calls "future" PC control. 
  4. Power connector (cable supplies) can be used to supply the needed DC to the K-Pod and I say "can be used" because via a simple mod
    (parts supplied) to the K3 and K3S  you can power the K-Pod via the DATA cable.
This was a nice addition to my K3 as for me it's handy to have the VFO control right beside the key. For contests I am able to program the first 3 (or more if needed) macro buttons for contest macros. The K-Pod worked right out of the box once powered up and connected to the K3 you had immediate VFO control, A/B VFO switching and RIT/XIT as well. It was then time to learn about macro programming.
There were just some minor issues I have:

  1. The provided USB cable provided is 3 feet which I found a bit to short, even with the front USB ports on my PC 3 feet was still very tight fit. 
  2. On first start up D4 on the K-Pod constantly stayed on. This was not normal and to correct this issue a Bata firmware had to be downloaded to the K3 or K3S if you have that model. I'm not to keen on loading Bata firmware as there could be some bugs with the software. 
  3. I have been spoiled by Elecraft and how easy it was to upgrade their products with new firmware. With your rig or P3 connected to your PC via a USB cable and a couple of mouse clicks using the Elecraft utility software you were good to go. For some reason the firmware update procedure for the K-Pod is much different.
A. All cables have to be disconnected from the K-Pod
B. Connect the USB cable to your PC
C. While holding F1 and F4 on the K-Pod plug in the other end of the USB cable to the K-Pod.
D. You now start the K-Pod utility program and update it's firmware.
 
 4. I found having the power cable and the RJ12 cable coming from the K-Pod a bit cumbersome. One of the main reasons for me doing the modification to the K3 so the K-Pod is powered via the RJ12 cable. 

Tuesday, December 27, 2016

Santa came with radio stuff !!

It was a nice surprise that my wife purchased the Elecraft K-Pod for me for Christmas. I did get it a bit early as she wanted to make sure it was here in time and no delivery issues arose due to the busy season. The K-Pod is a nice addition to my Elecraft lineup. It's an external VFO that can control both VFO A-B and RIT  via a selector switch . It also has buttons 8 (the "F" buttons) that you can program macros into. There is actually 16 macros that can be programed as each button can hold 2 macro commands (tap or 2 sec hold) The macros can be programmed using the Elecraft utility program on your PC.

Friday, October 7, 2016

Portable QRP operations in the park.

Hunting for that one contact
In Canada it's the Thanksgiving long weekend and I thought I would add Friday as a vacation day to make it an extra long weekend. The weather has been great all week very summer like and far from fall like. I decided to take advantage of this fine weather and get outdoors with ham radio! This time it was going to be our local park with my car, so instead of the Endfed antenna My plan was to warm  up the mono band HF whips. Apon arrival in the park I check with the website "band conditions" and it was showing all green on 30m. I thought "what the heck" I setup and the band was dead! I checked with band conditions again and low and behold the band was now deep on the red. It was off to the standby band.......20m. Going up and down the band I did find it quite but with the hurricane riding up the Eastern U.S. , it's Friday and lots are working and then the band conditions not idea the slow band made sence. I came across a station calling CQ at 14.041 followed by "up". Hmmm I thought....dxpedition or rare call. I engaged the dual watch on the KX3 and I listened for a bit and found there was no pile up in fact there was no one calling him! The call was AN400M that to me seemed like a special event station but at this point I was not sure from where? I set my KX3 for the common split of 2K and threw my call at 5 watts out there. He came right back to me with the standard 599 to which I replied the same adding TU and 73.  From there I was just spinning the VFO around 20m and really did not find much. I did come across 2 other stations signing AN400G and AN400I and that convinced me I contacted a special event station. I tried calling these other station but was not able to make the contact. It was then time to pack it up as there was a Blue Jays game to watch at 1pm today. While at the local watering hole waiting for the Blue Jays game to start I went on   QRZ.COM to find out it was a special event station out of Spain. They were offering a silver, gold and platinum awards but I was not able to get on their website it was not loading so I was not able to get anymore info.

Saturday, September 3, 2016

A great day for portable op's.

View from the portable op's position. 
It was another amazing day weather wise up this way and with winter soon coming I wanted to hit the trail again with the KX3. I was up and out around 10 am local time and off to search out on my bike a nice spot on the lake to operate. (Lake Ontario) The spot I found was right at the lake and I could see the police boats setting up their perimeter for the air show that would be happening around noon. I planned to be done my portable op's before the air show starts, the noise of the low flying jets (which is a very cool sound by the way) drowns out my CW coping skills. I set my endfed antenna in a sloper configuration as I found the inverted V was just not doing the trick. The CW open contest was in full swing and that sure was a bonus for making contacts. I checkout the Contest rules and they were looking for a serial number and name. I was able to make 8 contacts in the contest:
N4OX on 20m from FL
AF4RK on 20m from FL
K5WK on 20m from MS
N6ER on 20m from CA
KZ5D on 20m from LA
N5XZ on 20m from TX
W9ILY on 40m from IL
AA3B on 40m from PA
N8BJQ on 40m from OH
I found the contacts on 40m were no repeat backs and all the info was conveyed on the first try. As for 20m I was asked for repeats on my call, name and serial by most if not all the contacts. I raise the output of the KX3 to 10 watts and the external power supply seemed to handle it just fine.

Tuesday, May 24, 2016

A great weekend for portable op's

The setup by the Lake 

This past weekend the weather was great and the propagation seemed to be fair. So that meant it was time to take the Elecraft KX3 along with my bike and hit the trails again. I went out on Saturday and Monday (It was a long weekend up this way) to see if the Ham god's would smile on my QRP signal. On Saturday there was a CW contest in full swing which meant there was contesters with keen ears wanting to make contacts. On Saturday I setup at the same location I blogged about on Friday. The park located where we live was not too busy and I was able to scoop a nice picnic table. I was using the same setup the KX3 and mono band 20m whip mounted on my bike. I heard DL2SAX calling CQ test but I was not able to raise a contact from him. I did make contact with CO2RQ from Cuba who was in the contest. This contact told me my signal was getting out as up to this point I had not made any contacts with this setup. I then hung out at the QRP watering hole calling CQ there did not seem to be much action and I was beginning to wonder if Cuba would be the only contact. Then WL2LG came back to me, Len and I had a very nice QSO my report was 229 and I gave him 559. We had a nice QSO talking about antennas, rigs and weather. For Saturday that was it for my contacts.
A visitor 
On Monday I got out a bit later and the park was very active and finding a picnic table proved to be very challenging. The spot I had been at for the last couple of days was taken. I did find another spot about 15 minutes away from my first spot but again it was on the lake with a nice breeze. I setup and was on 20m in no time calling CQ at the QRP watering hole again. I did hear K4BBH and VE4AK but they did not come back to me when I sent out my call. I did notice on Monday the conditions had changed to the point where an S8 signal in no time was down at the noise floor. I did make one contact for the day with W2KJ, Joe was in North Carolina. He has a good signal that without warning would fade down to the noise floor. The Audio Peak Filter (APF) on the KX3 saved the contact for me as I was able to dig Joes fading signal to readable levels. We both were QRP at 4 watts and both of us were using Elecraft KX3 rigs. My RST was 329 and I gave him 559 and that seem to be it for my contacts for the day. I packed up and when back home satisfied with only one contact considering the conditions and my minimal setup.

Saturday, May 21, 2016

Out on the trail with the KX3


The bike all loaded up
I had Friday off and it was a beautiful sunny day so it was time to take my KX3 out on the trail to see how my new bike/ham radio setup works. My goal today was to see how to fit all I needed and find out what I really don't need to take on my bike and to make sure my antenna setup worked. I wanted to have an enjoyable ride and at the same time have all needed to setup for portable operations on the trail. The antenna was my mono band whip antennas from 10m-40m. I have them in a nice nylon roll up canvas bag I found they fit just perfect on the bikes horizontal support frame. I also have 2 canvas carry bags mounted on the rear of the bike that can be removed. While also loading the side bags I came to the conclusion that less is more! I had to trim down on what I was bringing. First off my KX3 was in a Pelican case and the case has to go as it takes up one side bag Since the KX3 is a trail rugged rig and I have a protective face cover ( from GEMS) for my next trip the KX3 is not going in the Pelican case. I also found the binder I use would not even fit in the side bags so that has to be re-thought out as well. The binder I have now is nice as I put a small metal plate in it for my Palm paddle to secure too via it's base magnets.
After loading up the bike the first thing I found out was the kick stand on the bike would not support the bike and the loaded side bags. It turned out to be a fine balancing act when it
Diamond K400 mount
came time for setup making sure the bike did not tip over. Since the bike is brand new and I told the bike store what I was doing he wanted to see if this bike stand would work as it is lower profile. I was told if it was not doable then to come back and a more robust kick stand will be installed free of charge.
Here is a list of the items I am packing:
KX3-on it's own with no Pelican case
Extra battery just in case- The Tracer battery pack
18 gauge counter poise- only for 20m at this time
Pens, paper and 3x5 cards with programming Kx3 instructions
Headphones- I don't use ear buds as my hearing is not that great and any noise around me tunes out CW.
Trunk lip mount base for antenna- Diamond K400 
Miscellaneous items- antenna connectors, adjustable wrench, tire repair kit for bike, hat, sunglasses and so on.
Lets get to the trail adventure..........I was able to bike to one of my pre picked spots down at the Lake where a nice size picnic table was available. The antenna mount setup worked great on the bikes rear rack which I mounted back at the condo in case there was issues. I attached the counter poise via a male female 14 gauge connectors. The rig setup was straight forward as I have done this many times in the past. I fired up the rig  and I wanted to see at this point if the counter poise was sufficient for a decent SWR and it was. BUT after
The setup
the tuning process had finished and my KX3 display returned it returned with an error message "ERR TXG D=114. Never had I seen this error before on my KX3 but then again Murphy is always close by to make things interesting. I was not able to transmit at all so I was dead in the water........and I was even picking up a G4 station calling CQ! I got the Iphone out and Googled the error code and it came back that possibly a TX gain calibration was needed to be done. That was not a big deal as the Elecraft software utility does this automatically but the rig has to be at home to do this. The trail/ham radio outing had come to a grinding halt but that was just fine as I really accomplished what I set out to do and that was see how things packed up, transported and how the rig operated using the bike to mount the antenna on. Back at home I did the TX gain calibration and the same issue persisted. I went online to the Elecraft reflector and was advised that it may be my internal AA batteries were low. They were just charged I thought.........Julie informed me it was about 3 months ago that happened. I
The surprise error code
charged the unit and all is well. So today it's another great day and it's off to the trails again to hopefully make a contact or two.    

Saturday, December 26, 2015

Win4K3suite added to shack.

Win4kSuite up and running
I have decided to change up my rig control software to Win4K3 suite I downloaded the trial version and was very impressed. I would had done it sooner but my PC was not up to the grade to properly run Win4K3 software and to be honest it was long over due for a PC upgrade. The PC was upgraded and if your interested that can be viewed here.  I decided to purchase the Win4k3 software (50.00) and change from my long time N4PY's Pegasus Plus rig control program. Carls Pegasus Plus program is very good and the support that Carl offers is excellent but I found the Win4k3 software was more catered to my Elecraft rigs. Once installed you have full rig control including the Elecraft P3, KPA500 amp and KAT500 tuner and the Sub receiver if you have these installed. (I did have the sub but sold it and I look back on that with regret)  I have the K3, P3 and KX3. The software installation has very good documentation and there are videos as well. Im the type of person who picks up much more from videos than written instructions. With the Win4K3 suite I was able to have PC control of all my K3 functions that some other software programs did not offer, such functions as spot, test, equalizer setup, terminal program, cw decode, Auto tuner and APF just to name a few. I also have the Elecraft P3 and with my PC upgrade I added a VGA capture board and since my P3 already had the SVGA board installed I N1MM contest software and Log40M. (More about Log40M in another post…. great software)
P3 on the monitor
was able to add point and click with my mouse to my P3 and this is great during contests. The SVGA board also allows me to view my P3 on a second monitor and mine being a 22" LCD monitor the P3 looks great on it. This software also has the availability to set up virtual ports. Now in the past just hearing "setting up virtual ports" made me nervous I really never had to much luck setting them up and getting them to work! With Win4K3 suite VA2SFQ makes it almost plug and play with both very detailed easy to follow steps and software that makes it painless…..and best of all IT WORKS!! The 3rd party software I set up to "play" with Win4K3 so far are If you have either the Elecraft k3 or KX3 (I have not setup my KX3 rig with the Win4k3 yet) and you are looking at PC controlled software then consider downloading Tom's trial version and give it a go!

Sunday, November 29, 2015

My CQ WW CW contest overview.

The QRP setup
I had a great part time effort in the CQ WW CW contest, I was not concerned with score or putting in a major amount to time in the contest chair. The key goals in this contest was to see how my CW reading by ear was doing and when on the rig to stay with it for the time I committed too. The reading code by  ear was fine up to speeds in around 25 BUT with some stations they were flying at around 35-40 wpm and that is just to fast. My code reader MRP4066 handled the high speed code no problem this software is not free but I found it to be the best! I entered the contest as single op, QRP single band (15m) and I met the requirements as a "classic" operator  I added this overlay to my submission. My total QSO count was 33 a score of 3,128 points and 10 zones. At my QTH I did not hear the usual amount of European stations I have in the past. My operating time was during the day from late morning to until late afternoon. During the late morning I head mainly Caribbean, African and some European stations but not many. As the afternoon approached more South and Central American stations came it as Europe faded.
I did have some "Murphy" moments such as…….I was not able to get my MFJ mag loop to tune at all at the start of the contest. Very quickly I found it was a very loose PL-259 connected on the rear of the loop's control box. Then for some reason N1MM+ set my CQ zone as 5 and not 4 and I did not click into this until about 10 contacts into the contest. Finally on the K3 there is a "test" setting and I use it to check macros without transmitting. Then old age had me forget to turn off the test mode, this found me thinking I was calling stations but was transmitting 0 watts….. Now that's QRP!!
Since I am operating QRP and using small MFJ loop antenna on the balcony my operating style was as follows
- I Use my VFO B to save a strong DX station that at the time has a huge pileup going. This stops me from wasting time trying to break the pile. Better to come back when the crazy pileup is gone. This worked great when I came across a Senegal station.
- Even when a station is at an S2 level but is just calling and listening my 5 watts can and did many times make it through for a contact.
- I don't use a spotting network as I found most of these stations have a huge pileup but I do have an Elecraft P3.  Using some hardware and software my P3 is seen on a 19 inch monitor and I am able to point and click on signals. My K3 then moves to that signal this allows me to see the activity on the band and Search and pounce these stations.
- When possible stay with a band such as 15m were my MFJ loop does not need to be retuned at all across the whole CW portion.
- Stick with my 250hz Inrad 8 pole CW filter so I can get between tight signals and only hear the op I want to contact.
In my post I am going to go into detail about my software I am now using and finding to be great for contesting and general QSO's It's now time to grab some eats and relax.

Sunday, April 12, 2015

Elecraft surgery part 3 of 3

Back to life again
It's time to solder in the new P30 and P35 headers into the K3 then put the rig together hold my breath and plug it in! Now that the old headers are out and the solder pads are cleaned off I now want to fit each header into it's spot and see how they fit. Then I will solder them in and it's very important these headers sit flat on the board. Here is the process I use to solder the headers in, I first only solder the 2 outer most pins. This allows me to reheat the pads if the header is not flat on the board if you solder 4 or more pads at once it's very hard to reheat them if you have to reposition the header. Once I am happy the header is sitting properly on the board I then solder the rest of the pins to the board. I
Soldering end pins 
don't solder them one after the other but instead I solder every other pin and then go back and solder the other pins. I do this because the plastic that supports the pins do get hot. I found if you solder one pin after the next the plastic supports have melted on me. Once the top side has been soldered I then turn the board over and solder the bottom solder pads in the same manner. Now that the pins are in I take a break and then come back and take a very close look at the pins. I am looking for proper soldering job,

Imports of checking both sides of board
also there has been no flow of solder from one pad to the next. Finally that I did solder all the pins, I have had this happen in the past were I have missed a pin. This is why I take the break as I have found if I don't I end up seeing what I want and I miss the unsoldered pin because I want to get to the rig put back together and try it. Satisfied with the solder job its time to clean the solder pads and I use a tooth flossing brush with 99% alcohol. This cleans off any residue and the alcohol evaporates. With the new headers installed it's time to put the rig back together and do the smoke test. At this point it's very important to take your time as you put the rig back together. There is the excitement in getting the rig back together and see how it work! This is the time you forget parts, not tighten parts, rush and misalign parts. Great care has to be taken when mating up the new headers. I had all go together well and as you can see from the picture at the top of the post the smoke test went well.
Flossing tool used to clean board
New header lines up with front board. 

Thursday, April 9, 2015

Part 2 of the K3 surgery.

It's time for the surgery
Beware of other components 
It was time to heat up the soldering iron, hold my breath and begin the surgery! First off you have to get to the P30 and P35 headers. Taking the radio apart is a very important step that close attention is required. Don't take short cuts, for example screws that are removed put them somewhere safe. When handling the rig use an anti static mat and wrist band. Finally when handling covers and boards be aware of fragile components, the last thing you want to do is damage components. Once the rig is apart I identify the components to be changed and made sure they really were P30 and P35. I then look at the parts Elecraft sent to me, last thing you want to do attempt to install an incorrect components. I now looked at the PC board and become familiar other components, wires or anything that I could damage when soldering. I have found in the past when concentrating on a very small section of a PC board you could at the same time place your very hot soldering iron close to sensitive comports and your not even be aware you are doing it. With my project today I had to move a wire that was close to P35 and I have to be aware of 2 components that
Front control head removed
Fume trap and soldering iron ready
are close to the pins on header P30. The first step is to cut the header pins right  the 90 degree bend and I am left with pins protruding from the board. With this completed I am left with pieces of pin sticking though the board that have to be removed. It's now time to setup my soldering station, fume extractor and solder feed station. What I do is hold the pin with my needle noise pliers and heat the solder pad and at the same time pull the pin out of the board. All but two pins came out which considering how many pins had to come out I was pleased with the results. I am left with solder pads to clean out (both top and bottom of board) and work on getting the 2 stuck pins out. The best tool to clean the solder pads is my Hakko 808 desoldering tool, it does a clean and fast job! With all the pads clean it's time to deal with the 2 remaining pins. I decided to trim the pins down close to the board and use the Hakko 808 to suck the pin out once it melted the solder. It worked great and I am now ready to install the new headers.
Trimming the header pins
The two stubborn pins
After using Hakko 808
Old out and new ready
The installation of the two headers is going to be part 3 of the post I have added some extra pic's or the removal of  P30 and P35

Tuesday, April 7, 2015

Doing surgery on the Elecraft K3 part 1

It's time for some surgery.
I contacted Elecraft to see what upgrades were available for my K3 and since my rig is not the 100 watt model it eliminated some upgrades. I have already done some modification upgrades to my rig already. There sure is something to be said for opening up your rig and waving a hot soldering iron over it for the first time. I will admit I never get used to the modifications that involve soldering. The next upgrade for my rig was replacing P30 and P35 which are headers. The new headers are gold plated and transfer data from the radio's brain to the rest of the rig. The new gold headers are more reliable and all new K3's are being shipped with these. P30 is a small 5 pin header but P35 is a 30 pin header! Before undertaking this task you need to have the "right" tools for the job. I am a firm believer that the right tools can be the difference between success and and the "oh my god" results. In this first post I'm going over the equipment I will be using.
First off an anti static mat with a wrist strap, when dealing with state of the art radios this is a must! A medium quality soldering station makes your soldering jobs a pleasure. I have the WellerWES51, this is a nice temperature controled unit. The tips can be changed out for varied soldering jobs and what's nice with this grade of soldering stations the tips heat up very fast and stay hot.
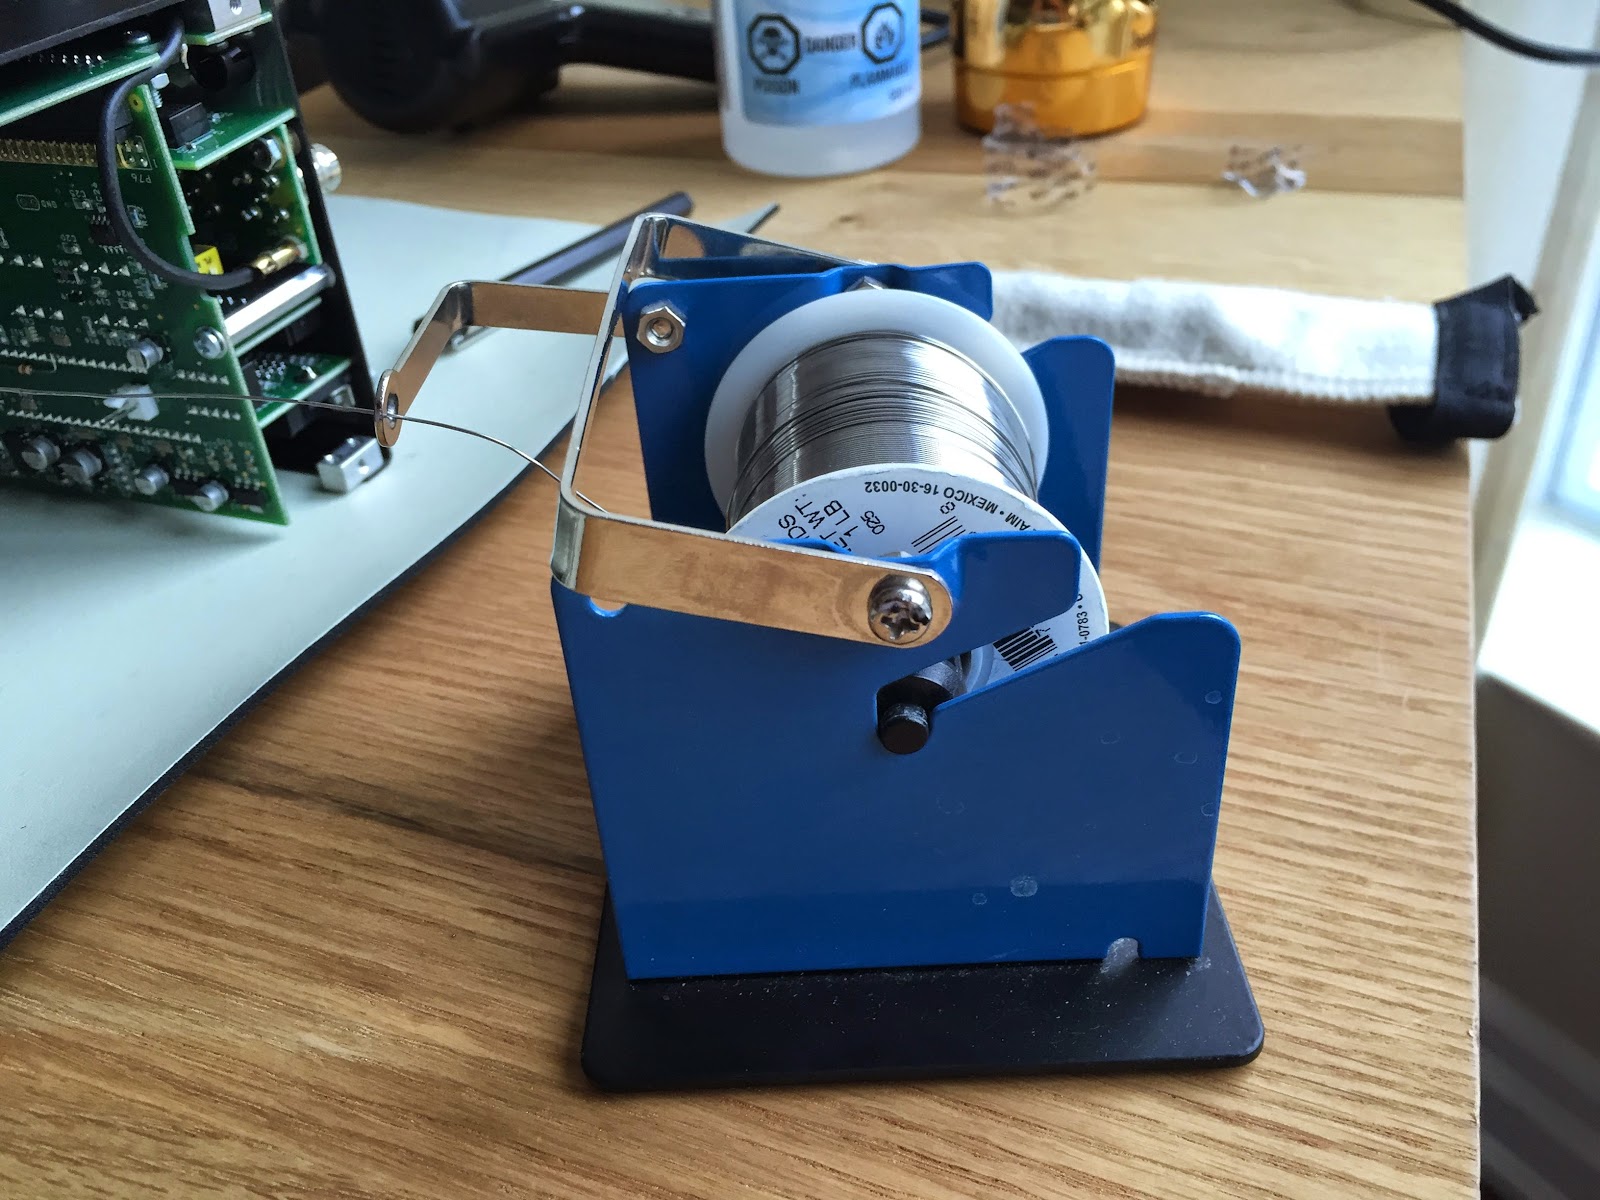
A soldering station would not be complete without some solder. I have in the past built the Elecraft KX1, 2 Elecraft K2's and at least 25 or more other projects having to do with ham radio. The solder I use is what's called SN63PB37. So what does this mean..........it's make up is 63% tin and 37% lead. This solder flows well and does not take real high temps to get it flowing. For the job at hand with my K3 I am using a diameter of .020. Also a good idea is to get a nice solder stand. The one I have was reasonably priced and allows me too gently pull and I have enough solder. I am not fighting with tangled solder or solder that keeps
rolling off the desk. When you solder there is smoke and it's a good idea to pickup a fume fan of some type. I purchased the Fume trap brand of fans. It works great and keeps the fumes away from you breathing them in.  You then have the hand tools that again have to be chosen and purchased wisely. You don't have to break the bank but don't go for super cheap. For this job I will be using my screw drivers, tweezers and diagonal cutters. Finally with this project I have to remove old solder from the pads that are on the K3's PC board. This is a part of the project if things go bad they can go really bad! In the past I have used the hand held spring loaded desoldering pump. They are ok but not great, I took the plunge and purchased the Hakko 808 desoldering tool. This has been one my best investments! This are most of the tools that I am going to be using and for this post that's about all I'm going to talk about. My next post (part 2) I am going to get into the steps I used to change P30 and P35 headers.


Monday, March 2, 2015

You can save some cash by double checking.

Over the past few weeks I had put some extra dust gathering ham gear up for sale. The sale was a successes and I ended up making 400.00 ham bucks. My main purpose for selling off some gear was to gather the funds for the new Elecraft K3 synthesizer (KSYNA3A as it's called) Without going into detail…..it's a very nice upgrade to the already great K3. While at the Elecraft site I was looking at what else the my K3 could do with in regards to upgrades. I came across the high stability ref oscillator  called the KTCXO3-1, it would be a great addition since I am now getting more into the digi modes and the less frequency drift the better. It's a 100.00 dollar upgrade and I wanted to do some more research on the topic before dishing out the cash! I ventured over to Google and typed it in, low and behold one of the sites that came up was VE3WDM blog!! Hmmm did I post about this at some time?? Off I went to my site and to my shock I found out I ordered the KTCXO3-1 when I ordered my new K3. It sure was good I looked into this before placing my order but having said that Elecraft is a great company and after explaining my realization I have had no problem sending it back. I'm getting older so the memory is getting shorter.

Sunday, February 22, 2015

ARRL CW Contest done QRP style

Oliver is asking……"Ahhhh dinner!!!
I took part in the ARRL CW contest this weekend in a part time way, I was not able to go full tilt as I had things around the house that needed to be done. I skipped the Friday evening as it's most of the big guns going at record setting CW speeds. I operated QRP, single band, non assisted, single transmuter and with my MFJ 1788 magnetic loop antenna. The bands were alive with CW and you would never think we were in the downswing of a solar cycle! Then conditions over all were great on 15m I was able to get on from early morning into the early evening. In the morning the bands were filled with
The rig setup
Europe and as the late afternoon rolled around the South Pacific started to boom in along with Central and south America. Some of the standout locations I heard were Bangladesh, Guam, Japan, New Zealand and South Sudan. None of which I was able to contact the pileups were HUGE!! Some of the highlights for me were contacting Hawaii, Cuba,  and grabbing a new DXCC Dominican Republic.
Score rundown is as follows
Contacts        DXCC's      Points
81                   39                9360

The equipment  used was the Elecraft K3 with 500,400 and 250 inrad filters, the Elecraft P3, Begali Contour Key and the Flex control external VFO knob and last but not least the MFJ 1788 Magnetic loop antenna. The software used were N1MM+ contest software, N4PY rig control software and MRP40 CW code reader for the chain saw speed code. I never had Murphy pay me any visits during
The contest software
the contest which really is a first time. I found 15m to be a great band very low noise floor and lots of action. I did venture up to 20m for a listen and from my location it was very noisy and I was glad I decided to stick with 15m.  Sunday seemed to be an easier day for making contacts I had far less repeats to do, Saturday I really had to work for each and every contact. Looking forward to the next CW contest!