Sunday, November 28, 2010

CQWW weekend

It sure does sound like the CQWW was a great success by all who took place Anthony EI2KC has over 400 QSO's and he is not even done yet!!! Congratulations on your 100th country on 15 meters.....contesting can give many happy returns eh. Check out Anthony's blog seems he is having a blast with the places that he is working. Oh and then there is Scott KA3DRR check out his blog too....it was snowing up this way but Scott did not fail to mention while the CQWW was going on the great California atmosphere....wish I was on the beach Scott. Seems he had a nice laid back weekend of turkey, sunshine, contesting ending with "radio dog" on the sofa . While your at his blog check out the link to his store I checked it out some very cool stuff to be had. Well for those of you south of the boarder I hope your contesting went well and the turkey dinners were great!!!!

Thursday, November 25, 2010

CQWW CW is a no go for this year.......

Well was very much looking forward to CQWW CW contest this weekend but due to my degenerative disk acting up in my neck it's off.  Was doing doing some work around the house 3 weeks ago and the next day lots of pain and a very numb right arm. It has gotten a bit better but playing with the rig and computer just aggravates it. Oh well maybe I can get some short stint's here and there in but all is not lost I am still able to set up the K3 for some WSPR work and compare some antennas as I can take breaks from that.

Sunday, November 21, 2010

The weekend projects......

The weekend is almost over but on Friday like most of us a "to do list" was made. As for the ham related items on the list I did not do to bad at all. As of Sunday afternoon the K2's 100 watt (KPA100) kit is done, installed and working in the K2 (well almost I did submit a post to the Elecraft site about a small issue). I set up  Ham radio deluxe computer control software to also work with my K2. I ran out of serial ports on the computer so I was able to use my Edgeport/8. It has 8 serial ports and is USB connected to my computer. I connected it to my computer installed the drivers and it works great. My radio room is clean along with my work area where I do all my kit building.

The new monitor to the right (click to enlarge)
My other ham related adventure for the weekend was to get a second LCD monitor. I have a second output on my video card and able to take advantage by adding a second monitor. It will help out during contests, on one screen I can run PowerSDR and a propagation page as well. On the other monitor I can run N1MM contest software along with QRZ.com. But there are many combination's I can try out over time both for contest and casual operating. The monitor to the left that is blank and hooks up to my laptop again during contest time. I like to to monitor getscores or work on my blog during slow times and it does not tax the CPU of my main computer.
New monitor with PowerSDR and propagation reports (click to enlarge)

N1MM along with QRZ.com (click to enlarge)

Wednesday, November 17, 2010

A new rig on the block............

Thanks go to RigPix for the picture (click to enlarge)
It could be here just in time to go under the Christmas tree the ICOM IC-9100. This rig covers them all HF/VHF/UHF/Satellite. There is 100 Watt output power including 50 MHz, 144 MHz and 75 Watts on 430 MHz. The rig has dual receivers that allow monitoring two bands at once this seems to be on most mid to top end rigs now. I have read here and there on the net that the pricing is in around 4,000.00 U.S. Well that's enough from me if your interested here is a link to the Icom IC-9100 and all the spec's.  
Third port from right is a USB port...about time.(click to enlarge)

Tuesday, November 16, 2010

Some Fall antenna work

Weekend only antenna click to enlarge picture
At my location having a permanent outdoor antenna is out of the question as the condo rules frown on any type of antenna. So I have a permanent 20 meter dipole in the attic. My out door antenna is a High Sierra Side Kick and it is only out during contests.  It is very portable, about 5 inches off the ground and very close to the deck. In other words not a very ideal location but it does the trick for me in the situation I'm in. When I purchased the antenna about 3 years ago I placed 8 radials in the ground I found as I changed from band to band the starting SWR before tuning was anywhere from 8.1 to as high as 15.1. In most cases it would tune down to 1.2 or less but with the high SWR it took some time and tweaking. For some time now I had planned to increase the radials and hopefully improve the SWR. I recently doubled the amount of radials from 8 to 16 and boy what a difference !!!  On all bands the SWR starts at around 3.1 or even 2.1 so this antenna work was well worth it and has made my tuning much faster and not the crazy SWR I had started out with in the past with only 8 radials.

Saturday, November 13, 2010

Kit building...the way you start determines your successful end

How most kits arrive
How it all begins
In my years of kit building I have had my share of blunders....but I have learned from them. To me the most important part to kit building is the start. We all have ordered a kit and waited and waited and WAITED for it to arrive. When it does arrive in the past I would just DIVE RIGHT IN and start building to get it up and working.  Many times the kit did not work and in some cases there was smoke !!!!.  I have learned  that the way you start a kit gauges your success. Hmmm you say...."don't you just start  building the kit" well here is how I start a kit see if you do the same ?.... When a kit arrives I am just like anyone else I am thrilled it finally has gotten here. For a week or so I have been typing the tracking number into the Post office's web page to see where it is. I have already downloaded the PDF manual and almost memorized it. When it arrives and I get the kit into the shack it's so hard to just not open the box turn on the soldering iron and get going......but WAIT.... that is not the type of start I have learned that works for me and I say LEARNED because I have had some major screw up's by just opening a kit and solder solder solder until it was done.
When a kit arrives this is the way I start.....
.
labeling bags
Most if not all manuals have a parts list and yes ALL manuals say CHECK THE PARTS!!!!
1) I take the time to check  ALL parts. When I say check, I check ALL resistor and capacitor values with a meter. The inductors I check the banded color codes as the value can vary with frequency.
2) I then check part numbers  and compare that to the manual. So diodes, transistors, IC's, crystals, relays, knobs, thermal pads, screws, standoff's .....you get the idea.
Checked parts

3) Each part or group of the same parts go into a zip lock bag with a stick on label. Static sensitive parts stay in their bags and a label goes on that bag.  The label may consist of the value such as it's resistance or capacitance,  part number, a description and if more than one of the same part (screws, resistors) the label will have the total amount as well.  All resistors, capacitors, inductors and hardware etc go into their own larger bag labeled hardware, resistors....etc When each part comes out of the zip lock bag the value or part number is checked again, the amount on the label is decreased (if there are more than one of the same part in the bag)
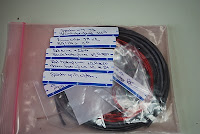
Wire and cable bag

When the above steps are done the kit building begins......Why do I do it this way......
1) The kit building process is rarely interrupted, a missing part can be sent to me and most times that part when needed arrives in time. Instead of getting to that point in the build and waiting for the part to come. Also some part numbers do not match the parts list. Most times it is the same part but due to availability limitations  another manufacture was used. I still email the kit company. Again I don't have to stop the build to check.
2) Checking each part gets me familiar with all the parts.  I have found very subtle differences with some parts. A mistake of soldering the wrong part in a slot is very difficult I find if I follow this process.
3) The work place is kept very neat with the larger kits this is very important as parts can get dropped and lost. I generally start out with about four large bags each containing smaller bags of hardware, resistors, inductors and capacitors etc.
4) This is the last and most important tip....these steps do take time and my XYL see's this as time spent building and not buying more kits.

Monday, November 8, 2010

Saying goodbye to a good friend.............

I have not sold to much ham gear in my time but I ended up selling my FT-1000MP MKV. It was a great radio but I had to make room for the Elecraft K3. The selling of the Yaesu allowed me to purchase more goodies for the Elecraft rig as well. I don't know about you but I treat my radios like fine china so when an offer came for the FT-1000 I decided to deliver and not ship the radio as the buyer was about an hour away from me. I wanted to show him what the radio was capable of.  I packed the radio up in the original box and off I went. When I arrived at the new home of my FT-1000MP MKV it was down to the ham shack we went. I was shocked to see "stuff" everywhere....the rig went onto his table and to make room all the "stuff" was clunked on the top of the Yaesu !!!!!! (it gets better....or worse I should say) This radio I prided myself with "not even one scratch could be found on it"......NOT NOW......now the fun begins. He wanted to see how the rig worked, I can understand that so on went the coax and I keyed the rig. The rig went into low power and a large red HIGH SWR warning was flashing. No big deal he said he wiggled the PL-259 around and all was fixed.....(so he thought) Well the PL-259 kept giving me and the rig grief now the decision was made to change to a different antenna and coax. The new ( I use that word very loosely) coax was made up of the braid having an alligator clip soldered to it and center was just a blob of solder. On the alligator went and the blob of solder was pushed into the center of the SO-239 on the rig. The coax switch (again I use coax switch loosely)  was a set of electrical light switches!!! Well payment was made and I bid my radio farewell.....a wise ham once told me if your going to sell your rig do it from home.....if not bring your own coax, key and dummy load....very wise words now that I  see what can happen.

Thursday, November 4, 2010

There's a new key in town....

Back in early October I was looking for a portable Morse code key for my Elecraft KX1. It came down to a toss up between the Bengli Traveler or the Palm radios mini paddle. There was a large price difference between the keys but what made my mind up was the emails and feedback I received about the mini paddle.
So the Mini palm paddle won the Oscar and was chosen. It seemed to be a nice size and from the measurements would fit in my Pelican carry case were as the Bengali key would be to large and it was  a  heavier key as well. The original plan was to have the palm paddle as a stand alone key but as we all know plans change....I began to think about  mounting it on the KX1. This would mean some changes to my storage plans as well as some additional thought had to be put into where and how to mount the key to the KX1. As I looked at the Palm paddle and the KX1 the only place it seemed to fit was the left side and just ahead of the D.C power connection. The right side space was used up with the headphone jack and  antenna hookup. The plan now was  to go  the hardware store to pickup some 4/40 nut's bolts and washers to mount the key to the side of the radio. As I said earlier "plans change" While at the hardware store I was directed to a two side tape called No more nails. The tape is good to -40 C to +120 C, water proof and virtually sticks to just about anything. Using the tape meant there would be no drilling in the side of the KX1. The base of the Palm key adhered with the tape very well to the side of the rig.
Paddle based attached to KX1 base.
Exposed pins on connecting cable
In the future if need be the base could be removed from the rig and I would not have extra holes to deal with. The tape seem so far to work excellent. The directions say it takes 24 hours for the two sided tape to fully cure. I made sure the Palm paddle base was placed so it would not interfere with the DC port. When not on battery power I am able to plug a DC cord in. The only downside to the Palm key I could find was the cable end that plugs into the back of the Palm paddle. To me if you were plugging and unplugging it after each use. As well coiling it up and storing it in a case after each use I feel the connecting pins had a good chance of getting damaged. For this reason I decided to make the cable a permanent connection to the rig and paddle. This would solve the installing and removing of the paddle connector and possibility damaging it.  To accomplish this the connecting cable had to be shortened so I removed the connector at the opposite end and soldered in a 90 degree connector that would make the permanent paddle cable more streamline. For some strange reason most pre-wired paddles the right paddle is dit and left is dah....well I'm the opposite so while soldering the 90 degree connector I also reversed polarity. ( something I have become very good at doing) The paddle base gave me enough room to train the Palm key cable under theKX1 from front to back of the rig.
New shortened cable
This allowed the radio to still sit flat even with the key cable under the radio. With the two sided "No more Nails" tape holding the Palm key to the side of the KX1 the paddles slide in and out of the housing very smoothly. This is great for storing the rig and key in a carry case as the key is well protected. I had just a short time to try the paddle and see how it preformed. I was very impressed that no adjustments were required and my main concern was put to rest as soon as I started to use the key.....it is very very smooth. While working on the radio I did find some exposed wires on the battery connecting cables of the KX1. Some heat shrink gave a fast that problem a fast fix.